
How to make sure your Express API doesn't get abused

Hey 👋🏻 !
I'm Kevin, a full-stack developer running a digital prototyping company with my business partner called Spin Up.
When I'm not consulting and building for clients, I'm writing content here, curating my newsletter or creating videos.
Outside of work, I enjoy handing out with my wife and sons - camping, hiking and kayaking or just curling up with a good book.
Making applications for the web is a lot of fun. Sadly, there is always a risk that bad actors will abuse them. Either using them too much or using them for nefarious means.
For most hobby projects that isn't too much of a problem. Once we start dealing with user data though, we need to step up our game and keep things secure. We have a moral and legal responsibility here. You don't want your application to be the cause of identity theft or abuse, so what steps can you take to try and prevent this?
This post will look at one strategy to achieve this goal - JSON Web Tokens. I'll also be focusing on one type of web server, Express. The principles remain the same though, even if Express isn't your framework of choice.
What are JSON Web Tokens?
JSON Web Token (JWT) is an open standard (RFC 7519). It is a method for securely signing requests between two parties.
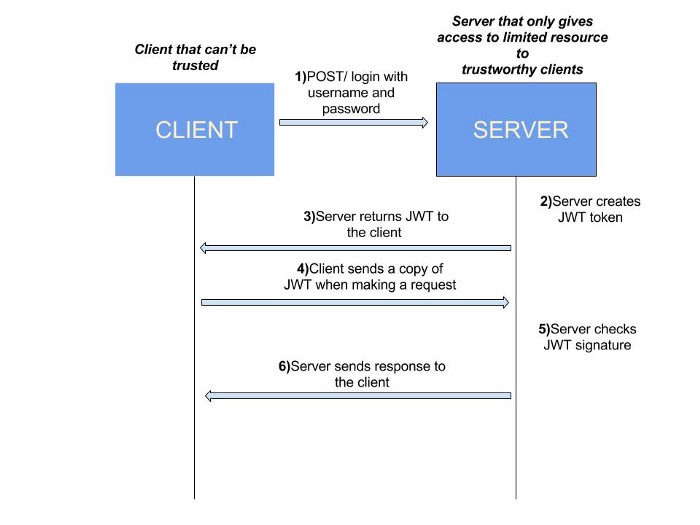
Once our user has authenticated, the server provides them with a JWT (pronounced JOT). Going forward, the client signs every request with this token. If the token is valid, the request succeeds, otherwise it fails.
Signing with a token in this way means that a user doesn't need to send their password on every request. It also ensures that only authorized users can access your API. You can configure the scope of a token so that one user could edit while another could delete and edit.
How do they work?
For this exchange to work, we need to carry out these things:
- Verify the user identity (not covered in this post)
- Provide the user with a valid token
- Check that the token is valid on a protected route
- Respond in the correct way
How do we use them?
Setting up a server to securely sign and manage our tokens is a huge challenge. There is an awesome web platform called Auth0 that does most of the heavy lifting here. They have free accounts that can service up to 7,000 users. I'd love for that upper limit to be a problem for one of my side-projects but I haven't reached it yet!
Setting up Auth0
Once you've signed up for an Auth0 account you'll need to configure an API route. Here's a short video to step you through this.
Adding middleware to Express
We can add middleware on any Express route or group of routes - as many or as few as we like. Each of these can be responsible for a small task. This could be checking the request, modifying it or starting to build a response. This is sometimes referred to as chaining middleware. Working in this way allows us to deal with each of the tasks from request to response in an isolated, functional way.
In this case, we want to verify the JWT on our protected routes. If the JWT is not valid, we'll return a 401 status code - which means Unauthorized.
We'll use two libraries to help us out:
- express-jwt: This is a middleware library that once configured will do the work for us. It will check the JWT and return the relevant response.
- jkws-rsa: This will use the JSON Key Webserver provided to us by Auth0. We'll use this to generate a secret which then be verified by our middleware.
Here's the code the middleware:
const jwt = require("express-jwt");
const jwksRsa = require("jwks-rsa");

const checkJwt = jwt({
  secret: jwksRsa.expressJwtSecret({
      cache: true,
      rateLimit: true,      jwksRequestsPerMinute: 5,
      jwksUri: 'https://dolearning-egghead.eu.auth0.com/.well-known/jwks.json'
}),
audience: 'https://catchphrase.app',
issuer: 'https://dolearning-egghead.eu.auth0.com/',
algorithms: ['RS256']
});

module.exports = { checkJwt };
We import that to our server file and we're ready to start protecting!
Now we add the middleware in the chain of any route we want to protect. We could protect every route. A better approach is to only protect those that will have sensitive information.
Here is an example of an unprotected route:
app.get("/test", (req, res) => {
  res.send("This is an unprotected route.")
});
#+END_SRC

Here is an example of a protected route:
#+BEGIN_SRC javascript
app.get("/test-auth", checkJwt, async (req, res) => {
  res.send("This is a protected route.")
});
If you call the first route, you will always get a 200 response with or without a JWT. The second route will return a 401 with an incorrect or absent JWT.
Again, if video is more your speed here is the process again.
How we get a token?
So far, we've setup Auth0 and checked whether a valid token is present. At the moment, that's always going to be false because we have yet to create valid tokens.
For this exercise, we're going to create a route that will do this. Normally, we'll have a username/password exchange, we'll create the key and pass it back. For now though, we'll give a key to anyone who knows where we keep them.
I'm going to set up a /get-token route and from there request a new key from Auth0. Here's the code for that:
require('dotenv').config();

...

app.get("/get-token", (req, res) => {
  request({
    method: "POST",
    url: "https://dev-signup.eu.auth0.com/oauth/token",
    headers: {"content-type": "application/x-www-form-urlencoded"},
    form: {
      grant_type: "client_credentials",
      client_id: process.env.AUTH0_CLIENT_ID,
      client_secret: process.env.AUTH0_CLIENT_SECRET,
      audience: "https://catchphrase.app"
    }
  }, function(error, response, body) {
    if (error) {
      res.status(400);
      res.send(error);
    }
    res.send(body);
  })
})
You'll see I'm using the dotenv library. That allows me to keep sensitive secrets like the Auth0 client secret out of source control. I store them in a file called .env. I can then call the config function which makes them accessible in my process.env variables.
Requesting from this route will give us a JSON object which contains an access_token - this is the JWT. If I use this key now to sign my requests I will be able to access my protected routes.
Disadvantages
JWT is a great method to protect our routes. But, as with any security approach is not 100% secure.
The tokens have an expiry date - by default it's 86400s which is one day. During that day though, anyone with that token can pose as your user. Once the token is in the wild it will be valid until the time expires.
What's next?
I left out an important step here - the initial username and password exchange. Here are links to some Auth0 tutorials that might get you started.
You can follow me on Twitter or sign-up for my newsletter if you've enjoyed this and want to be kept up-to-date with new articles, courses and videos.


